
LODplanner
Post originally authored for the blog of Strategie Digitali, on July 6th 2018. Background check: what do we mean by LOD As we’re sure you’ve heard, BIM has this thing called LOD and not only is using the acronym differently than other industries but almost each Country are using it differently than the others. If […]
Post originally authored for the blog of Strategie Digitali, on July 6th 2018.
Background check: what do we mean by LOD
As we’re sure you’ve heard, BIM has this thing called LOD and not only is using the acronym differently than other industries but almost each Country are using it differently than the others.
If you haven’t heard, yours must have been a beautiful no-wifi zone but it’s time you do some reading and, honestly, we can’t recommend anything better than:
- The Many Faces of ‘LOD’, written by Marzia Bolpagni as a guest writer on Bilal Succar‘s BIM ThinkSpace;
- its predecessor What is this thing called ‘LOD’ by Anthony McPhee on his practicalBIM blog (it’s from 2013 but still valid).
And just in case you’re not in the mood for reading, because we really need you to follow through on this basic concept, what we’d like you take home is that:
- LODs are about the progression of work and the reliability of data/geometry for an element within the model: during pre-design you might not have decided all you need to decide on one element but as the work progresses we expect certain elements to be worked out and defined;
- LOD specifications come down directly from model uses: you define your goals, define which uses for the model will help you to reach that goal and then you define which information/geometry you need for which categories in which stages to reach your goal and bring your model home.

The basic reference for specifying LODs is the BIM Forum Guide, and although it’s a crucial document for the industry, produced by the effort of some heroes out there, there’s one thing lots of people keep conveniently forgetting:
Because BIM is being put to an ever-increasing number of uses,
the group decided that it was beyond the initial scope to address all of them.
Instead, the definitions were developed to address model element geometry,
with three of the most common uses in mind
– quantity take-off, 3D coordination and 3D control and planning.
(BIM Forum, Level of Development Specification Guide 2017)
Very clearly speaking, you can’t simply refer to the BIM Forum guide if your model needs to guarantee uses that go beyond those three.
For a Model Uses list, you can look up the BIMe Initiative here. There’s a lot of them.
Now, another very important think you should know regarding LODs is that their specification is one of the most crucial, time-consuming tasks in the work of a BIM Coordinator.

1. Enters the LOD Planner
The LOD Planner is a very nice tool whose catchy slogan is Smart Lean BIM ™. Their claim is quite bold:
A simple cloud based software to create:
Live BIM Execution Plans and Visual BIM Scopes
…in minutes not days.
The tool has been gaining in popularity, lately: I’ve seen mention of it no later than two weeks ago at Autodesk University London.

2. How does it work
As soon as you’re logged in, it will ask you to create a new project. Let’s say I want to create a project. I’ll pick a name, a category from a pick-list (and of course it’s going to be entertaining) and my role from another pick-list. Let’s try a role I’ve never tried before.

You hit “create” and you’ll find yourself into a dashboard. You can perform futile tasks like picking a cover picture (not so futile if you have dozens of projects) and the location of your project. It’s going to be Haiti for mine.

Next most important thing for LODplanner is the team and we can’t help but agreeing. In this interface I could, for instance, add other collaborators to my wonderful group of work, with different privileges being:
- Viewer;
- Editor;
- Manager.

Privileges rules are pretty straightforward, so I won’t bother you with this.
What I will bother you is adding sections to your plan, because this is really where LODplanner shows its amazing value.
3. Adding Parts to your Plan
When you’ll start, they will give you an example project with different… well, examples of all the parts you can add to your plan. Among the most used, you can:
- Identify BIM Goals in accordance with Penn State’s well-known (although a little out-of-date) framework;
- Set up File Naming Standards, of course in accordance with BS 1192;
- Set up a Quality Control Strategy;
- Draft a table for Software and versions;
- Describe 3d BIM Coordination Process (a fancy way of saying Clash Detection, but one of them is based on a workflow described by Brian Myers so it’s bound to be good);
- Define model delivery responsibilities and frequency;
- Determine BIM Roles on the project;
- Describe the Coordinate System used on the project;
- Define locations, permissions, access coordinates and such on the Common Data Environment;
- Create a Mission Statement;
- Add BIM Definition from the BIM Dictionary.

But how do you add your own part?
3.1 Let’s use an example
First things first: you need to walk before you can run. Up to this point you should have realized that the LODplanner does so much more than… well, LOD.
Let us try and add something from the example project and let us do something basic: if you add the BIM Definition from the BIMdictionary, this is what you’ll get.

Unimpressed? Well, ok, let’s try something more difficult. If you add the Project Coordination Process inspired by Brian Myers’ you’ll get something with more meat around it. Below’s just a snapshot of the introduction table but there’ll be so much more to this.

3.2 But how do you write your own?
Easy. You just hit “Create new” and then, before starting to write, you’ll have to pick the Section Type among:
- Introduction;
- Project Information;
- BIM uses;
- Processes;
- Standards;
- Technology Infrastructure;
- Deliverables;
- Contract Terms;
- Other.
The good news is that no matter which section you pick, it won’t affect the template of what you’ll be able to write.
The bad news is… well, no matter which section you pick, it won’t affect the template of what you’ll be able to write.
I could, for instance, use a Technology Infrastructure type to write a descriptive section of how your connection should be to work on the project. Don’t do that. Tables are good. Tables are your friends.

Everything else is a pretty straightforward web-based text editor.
4. Defining Scope
On your upper left corner, you’ll have a bar and we’ve been working on the “Plan” section.

The “Scope” section is one of the key features of the LOD planner, and I dare say it’s the one that gives it its name. It creates a nice, visually compelling LOD progression matrix.
4.1 Define Milestones
As you know, the first thing you need in order to create a progression matrix that make sense is knowing which milestones you’re going to have. The LOD Planner allows you to create your own milestones.

When you’re done, this is how the header of your table might look like.

4.2 Add a Scope from Template
Below your phases, you’ll have the option of adding the actual categories and elements to be specified.
By clicking “Add“, you can add them from available templates such as Foundations, a general Architectural or Plumbing Scope, Low Voltage and so on.

Let’s have a look at the Foundations Scope.

Since I have more phases than the template is expecting, no specifications are set for the first two. I can click on a box and easily drag and drop specs where I see fit. I can also increase the LOD level in order to shift from 100 to 200 to 300 and decrease it until I can delete it.
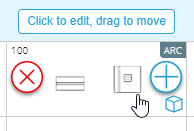
If you could grant me one wish, I would also like a system that prevents situations like this to happen: you can’t decrease LOD. It’s a recipe for a disaster.

If you edit the scope, you’ll also see the different options that you have within the template.

4.3 Create your own Scope
But can I write my own scope, my little readers will ask immediately.
Of course you can.
And it’s super easy too.
By hitting “Create”, you will be given the chance to reinvent the wheel and you will be requested to pick:
- a phase for your scope among:
- Concept;
- Design;
- Validation;
- Documentation;
- Preconstruction;
- Construction;
- Commissioning;
- Handover;
- In use.
- a name for your scope;
- a description for it.
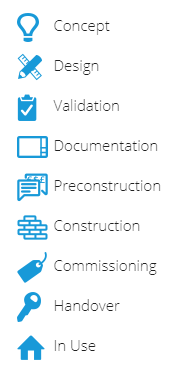
The Phases of your Scope have pretty icons too
When you’re done, you will be able to select elements based on their repository. For instance, I can decide to create a scope section for the facade of my Claudio’s pavillion, which of course will be randomized panels.

You can also add information to your scope, so this isn’t an out-of-the-box all-BIMs-are-equal kind of tool: you can basically specify everything with it, for every model use, as long as you respect the American LOD framework and numbering.
5. The Flow Tool
Last but not least, you have a tracker for your model that’s basically an AGILE/Scrum backlog. A backlog is a list of features which are known to be necessary at a specific moment to clear the product/work package release or, in our own words, to conclude a phase. It’s immediately clear how this concept goes hand in hand with BIM and should marry the concept of LODs right away, as LODs are basically a progressive feature specification matrix.
In the LOD Planner, every subcategory is treated as an element and can be monitored individually. It has its own

Elements can be assigned a team member, you can define time span, checklists and attachments or links. For instance, I can assign Wall Foundations to myself and then, on the timeline, drag it into the “In Progress” tab because of course I’m taking care of it right now.

The bar automatically calculates how many elements are in progress based on the totality of elements.
6. Print it!
At the end, or even not at the end, you can export sections of your document or the whole document into a pdf. You will love the progression bar saying things like “hammering square pixels into round holes”, but you will love the final document even more.

7. Wishlist
Ok, so that was the LOD Planner in a nutshell and we think it’s a wonderful tool. A couple of wishes on the shelf, for you guys to consider:
- even more multicultural. Right now you give the option to choose your standard in the Account Preferences, meaning that me as a practicioner I have to pick which kind of LOD I want to use in my life. I would love for the world to be like that. However, in my personal experience this is often project-based, more than practice-based. I would love for this control to be taken down a level and be on the projects. You might want to give that a thought.

- add your own LOD. Ok, I don’t mean it like that, but still we’re missing a couple of local frameworks. The Italian one, for instance. Just saying. I’m sure that people will be willing to contribute if you open that chance.
- Share! In the full version of the product, you can share your work with the community and become one of those “templates” I mentioned. This feature is limited in the trial version I had, which makes sense as you get just three scopes and three systems per scope, but still one might be able to carve out something well done within those limitations. Or you could sign up to the trial now, since you have a 14 days of unlimited taste for this amazing tool.
So we’ll leave you with those suggestion.